Cartesian Diver with a twist

I love the “Cartesian Diver” experiment (see here for how to make it). My one issue is that the presenter needs to hold the bottle to cause the effect. If the “submarine” is well balanced only a moderate amount of squeezing is needed but still there’s some tell tale signs of muscles contracting – it just doesn’t look natural!

On the hunt for a way to present the effect remotely I had the idea of using a blood pressure cuff to squeeze the bottle. I removed the pressure gauge and just directly linked the ‘squeeze bulb’ to the cuff. It now means you can stand a distance away and move the submarine. It’s also brilliant for young children or those with a physical disability who don’t have the hand strength to squeeze the bottle tight enough themselves. I can also see this being turned into an exhibition at a science centre.

Magic forcing grid – Maths Magic

What’s the effect?

A 4×4 square grid is created on a piece of paper with numbers from 1-16 (see top left hand picture). Spectators choose 4 numbers at random from the grid and the total always equals 34.

What you need?

  • Pen and paper

What’s the method?

There was one crucial detail left out from the description of the effect. When the first number is chosen and circled, the remaining numbers on that row and column are crossed out (see the top right picture). grid16a

There is now only a choice of 9 numbers for the second spectator to choose from. Again the choice is circled and the row and column is crossed out. For the third choice there are only 4 numbers remaining. The final choice isn’t a choice at all as there’s only one number that hasn’t been circled or crossed out. The total of the 4 chosen numbers is 34. Every time! (see the bottom right picture for one possible example)This can be repeated with different choices to show that it always totals 34.

Classroom investigations

There are a number of extensions that can be made for classroom investigations.

The obvious extension is working out what the total T would be for different grid sizes (nxn). The table below gives the first six results.gridtable

There is a general formula that can be set as a task for students to find. The total T is the grid size n multiplied by the central number of the grid. The central number is obvious when odd numbered grid sizes are constructed. However it’s easy to calculate by adding the first and last numbers (n^2) and dividing by two. Hence the term in the brackets of the general equation.gridequation

A further investigation could explore the links between this trick and Latin Squares.

Dice Towers (advanced version) – Maths Magic

What’s the effect?

The magician turns his back whilst the spectator stacks the dice up into a tower. The magician turns to face the audience and the spectator points to any of the dice in the stack (except for the top one because this is too easy). The magician then names the number on the top face of that dice even though it is hidden.

What you need?

  • Dice

What’s the method?

When you look at a die the maximum number of faces that you can see is 3. In this trick you are only going to be able to see 2 faces and from that information deduce what all the other faces are.

dicenets

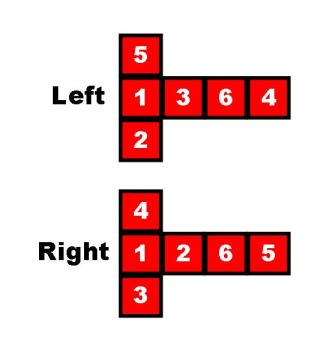
Dice have their faces arranged so that opposing sides always add up to 7 (i.e. 1&6; 2&5; 3&4).  The Simple version of Dice towers makes use of this property. There are two possible arrangements of the numbers on a die that have this property (see the cube nets diagram). What I shall call left- and right-handed. They are mirror images of each other.

For what follows I’m using a left handed arrangement which in my experience is more common (the trick can be adapted for right handed dice by flipping all the rules below).

dice123I’ve come up with a method to calculate the remaining faces. It’s took a number of iterations to get it to a level where the method is fast and relatively easy to use. I’d love to know if you’ve got a better method or if I can describe it better.dice456

There are two cycles you need to be familiar with and these are illustrated in the two diagrams. Taking the 123 cycle as an example… If you see 1 on the left and 2 on the right, you know that 3 must be on top. Equally if you see 3 on the left and 1 on the right, then 2 is on top. This is just a simple rotation of the dice around the common corner. The same principle holds for the 456 cycle.

If you see the left and right numbers in reverse order (for example 2 on the left and 1 on the right) then the dice is upside down and 3 will now be on the bottom face. The top number is now 4 because it is on the opposite face.

So now we’ve got 2 rules to follow to make our calculation:

Rule A – If both the two numbers you can see on the left and right faces belong to the 123 or 456 cycle AND the faces are in numerical order then the TOP face will be the remaining number of that cycle.

Rule B – If both the two numbers you can see on the left and right faces belong to the 123 or 456 cycle AND the faces are in REVERSE numerical order then the BOTTOM face will be the remaining number of that cycle. The top number can be easily obtained from this information.

The question then arises what happens when the numbers on the left and right faces come from the different cycles (for example 1 and 5). You then need to do a little mental gymnastics. You need to switch in your head one of the numbers for its opposite so that the left and right faces are in reverse numerical order. In our example we have to switch the 1 for a 6 to make them in reverse numerical order. If we switched the 5 for a 2 it would be ascending order. Once we’ve decided which side to switch for its opposite, the final step is easy. As we’ve now got a 5 and 6 from the 456 cycle we know the top face is a 4.

Rule C – If both the two numbers you can see on the left and right faces DON’T belong to the 123 or 456 cycle then switch one of the numbers for it’s opposite so that the cycle is in REVERSE numerical order, then the TOP face is the remaining number in that cycle.

Here’s another example for rule C: Left = 2; Right = 6. The two numbers are from different cycles so we need to switch one number for it’s opposite. We switch 6 for 1 so that it’s in reverse numerical order. And now we’ve got a 1 and 2 from the 123 cycle and we can deduce the top number is a 3.

Dice towers (simple version) – Maths Magic

dicetower  What’s the effect?

A spectator stacks up a tower of dice whilst the magician’s back is turned away. The magician turns around and immediately names a number out loud. This number is the total of all the hidden faces (i.e. the top and bottom faces except for the very top one).

What you need:

  • Dice (I usually use 4 dice). The bigger the dice the better as it makes it very visual.

What’s the method?

The principle behind the magic is that opposite faces of a dice total 7. eg 1&6; 2&5; 3&4.

For a tower you then know the total sum of ALL the top and bottom faces will equal 7 times the number of dice in the tower. So for the example in the photo the total sum is 28.

To calculate the total sum of the hidden faces you need to do a very simple calculation when you turn around to face the audience. First look at the number on the very top and then subtract that from the number you obtained earlier. In the photo example you have to do 28-6=22.

Walking through a postcard – Experiment

What’s the effect?

You cut a hole in an A5 piece of paper large enough for someone to climb through. (This is a good follow on activity from the “Coin through an impossible hole“.)

You will need:

  • A piece of A5 paper
  • Scissors

walkthru

What’s the method?

Start by folding the A5 piece of paper in half lengthwise (see photo 1).

Now make cuts in the piece of paper starting from the folded edge and stopping 1cm from the opposite edge. You want the cuts to be spaced by about 1cm. The result will look like a paper comb (see photo 2).

Now turn the piece of paper around and make cuts from the opposite side. These cuts are made in between the cuts you’ve previously made. Again stop cutting 1 cm from the edge. You will now have created a zig zag shape as in (photo 3).

The next step (also shown in photo 3) is to carefully cut along the folds you made at the start. However, you want to leave the folds on the left and right edges intact. When you’ve completed these cuts and carefully unfolded your creation it should look like photo 4.

By carefully pulling the paper apart you will have created a large hole in the middle (see photo 5). You can then climb through it or have a volunteer climb through. You need to watch the paper doesn’t catch on clothing or it will tear easily.

This is a good activity when teaching about perimeter and area.

Coin through an impossible hole – Experiment

What’s the effect?

A 2 pence coin is pushed through the hole made by a 1 pence coin.

You will need:

  • A piece of paper
  • 1x 2p coin and 1x 1p coin
  • Scissors
  • Paper/pen

Image

What’s the method?

The series of photos above outlines how to do this. Start by drawing around the 1p coin with the pen or pencil. Then carefully cut out the hole with the scissors (see photo 2).

The challenge is then to push the 2p coin through the 1p coin’s hole. Which would seem impossible as the hole is clearly too small (as can be seen in photo 3).

To achieve the impossible… fold the paper in half, with the fold going directly across the hole’s diameter. Then insert the 2p coin into the paper (see photo 4).

The hole still seems to small but if you pinch the paper and fold the paper in such a way so that the curved hole begins to get straightened out (see photo 5) eventually you’ll reach a point where the 2p drops through the hole.

This is a good way of introducing the idea of circumference and diameter.

Balloon hovercraft – Experiment

What’s the effect?

A simple to make hovercraft that will glide over smooth surfaces.

You will need:

  • A CD or DVD
  • Plasticine or “Blue tack”
  • A balloon
  • A drinks bottle lid with sports cap. (“Fruit shoots” work well.)

hovercraft3

What’s the method?

Make a ring from the plasticine or “Blue tack”. Use this to create an airtight seal between the CD and the bottle cap. (Alternatively you can use a hot glue gun to stick the cap to the CD.)

Inflate the balloon and it put over the top of the sports cap. See the bottom photo for the completed hovercraft.

By adjusting the air flow out of the balloon with the sports cap, the CD will gently hover on a smooth surface. By pushing the CD sideways it will move with very little friction over a smooth surface.

Static straw – Experiment

Image

What’s the magic effect?

This amazing science demonstration appears like you can move a straw with the power of your mind.

You will need:

  • A drinks bottle
  • A plastic straw (I find McDonald’s straws work best. Subway straws don’t work at all.)


What’s the method?

The straw is moved by electrostatic attraction. Before balancing the straw onto the bottle lid you have secretly charged it up with ‘static electricity’. This can be done with a cloth rag or fleecy jumper. Squeeze down hard on the end of the straw through the material and pull the cloth along the length of the straw in one fast motion. The straw should be now charged. Carefully balance the straw on the bottle lid. This is harder than you might think as the straw is already being attracted to your fingers. Try to minimise the amount of time you handle the straw as you don’t want the straw to lose its charge. Now if you place your finger close to the end of the straw (as shown in the photo), the straw will start rotating and moving towards your finger. It looks very spooky!